Drawing Challenge

Lately I’ve been feeling off my game. I don’t know if it’s because I’m juggling three different jobs or that I’ve been trying to figure out new ideas and projects to do for this blog. Making things and being creative takes time and energy. Having an idea is easy, it’s making that idea come to life that’s the tricky part. 
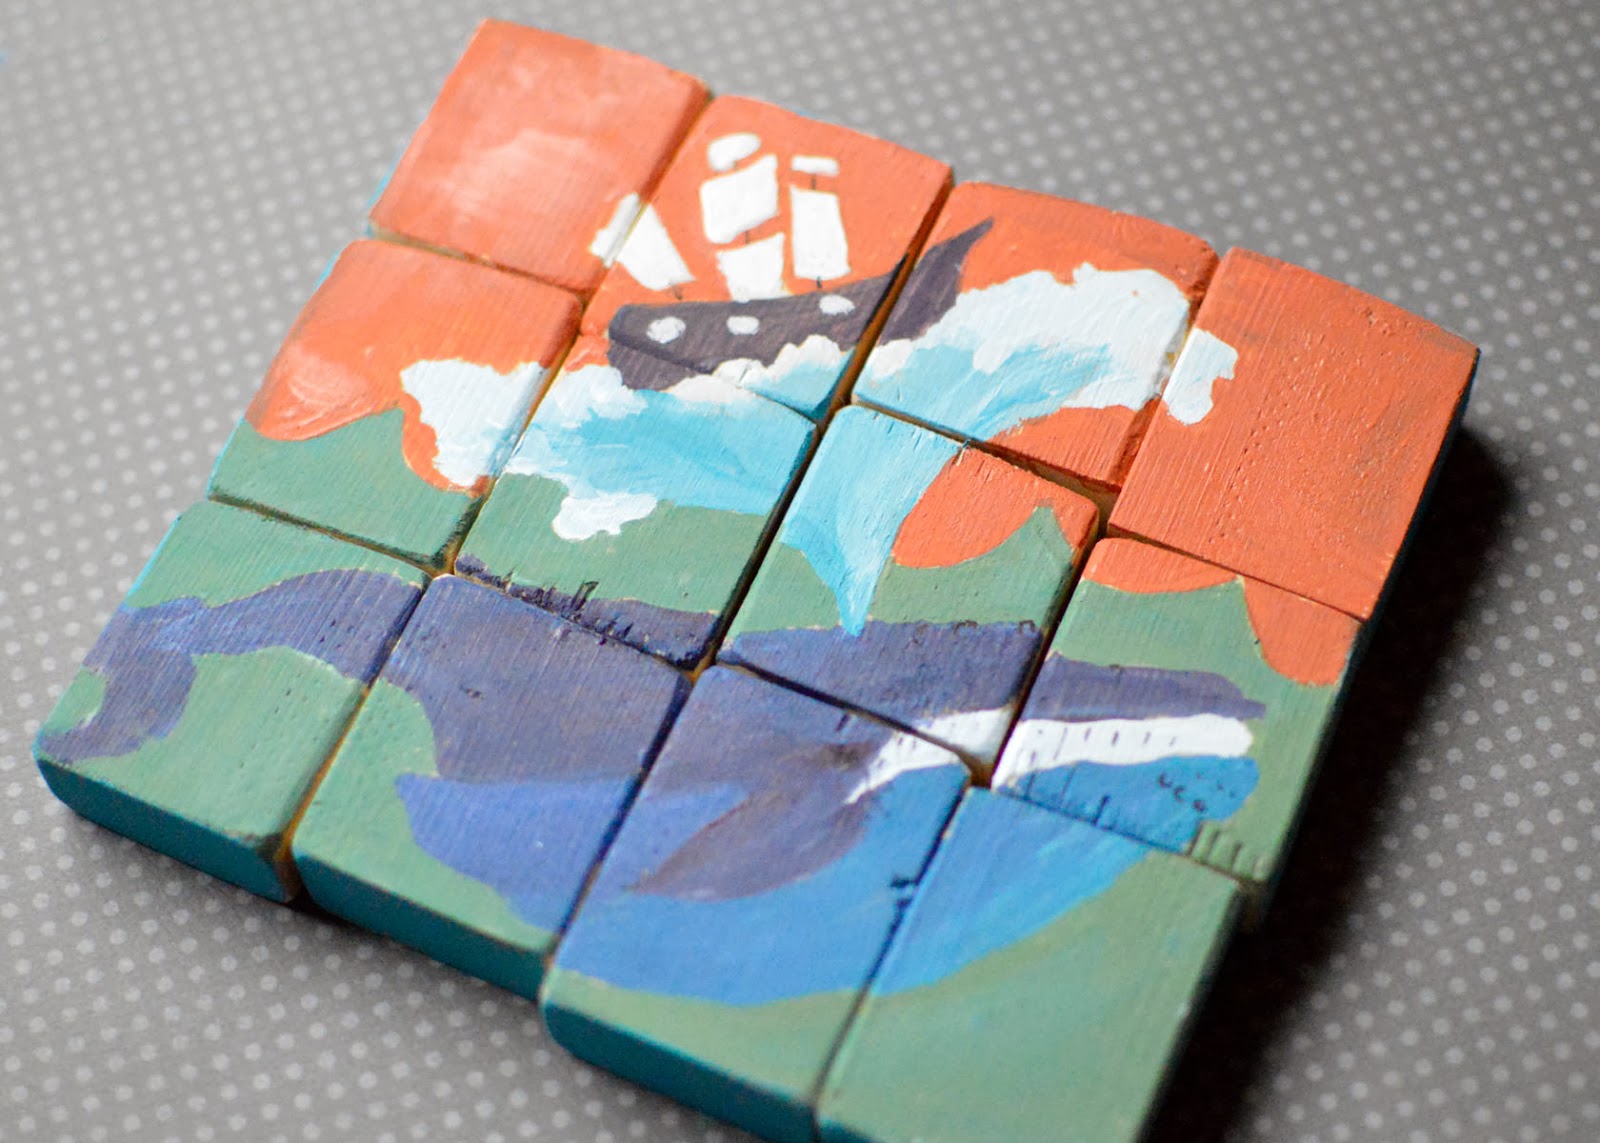
I’ve always been into art; from a very early age. My dad used to take me to museums here in San Francisco and we’d sit and draw all the taxidermy animals. In school I was always the one in group projects that drew on the poster boards. I had no idea what we were learning, I just liked drawing. 
I have this tremendous imagination. Great ideas. I get excited thinking about all the things I want to build, paint, draw, write, create. Sometimes I’m effective in my endeavors as an artist. My creative juices are flowing and my brain and my hands are so connected to each other. 
Lately however, I’ve hit a wall. My creativity, and my motivation, and my belief in my own ability has stopped working. Nothing I do is working, and it’s very frustrating. 
Today I just wanted to give up. I was working on a new project for this blog and the whole time I just wanted to throw it away. 
Half way through, I did. I chucked it and laid on my bed, watched funny youtube videos and ate cereal.
After two bowls of frosted mini-wheats, and a movie night with my friend I felt a little better. 
I realized that it’s okay to be frustrated. 
The fact of the matter is that I love what I do. I don’t care whether its super easy or really hard to work through. I care about what I’m doing–I care about working on projects, and drawing and painting and teaching people how to create work of their own. I don’t want to quit. I want to break down that wall and challenge myself to keep going. It’s okay to stop. Everyone needs a break every once in a while, but to me, quitting is not an option. Quitting means that’s it…it’s over…I’m never doing this again. 
If I quit, I’m giving up a part of myself that makes me uniquely me. 
So I need to stop, and re-organize. 
What is it that will make me creatively happy? 
What do I need to create that will get me excited to create more?
I’ve been in this spot before as an artist. I’ve been stuck behind this wall. I know that what I need to do is just draw. I need to put away my paints, and my computer, and my piles of project making things that are strewn about my living room and just focus on my sketchbook. 
Like I said before, I draw ALL the time…but when it’s mixed up in all the other stuff I work on, it doesn’t get the attention it needs. 
So for the next while,  it is back to basics. I will be just be drawing. And I would absolutely love for you to join me!

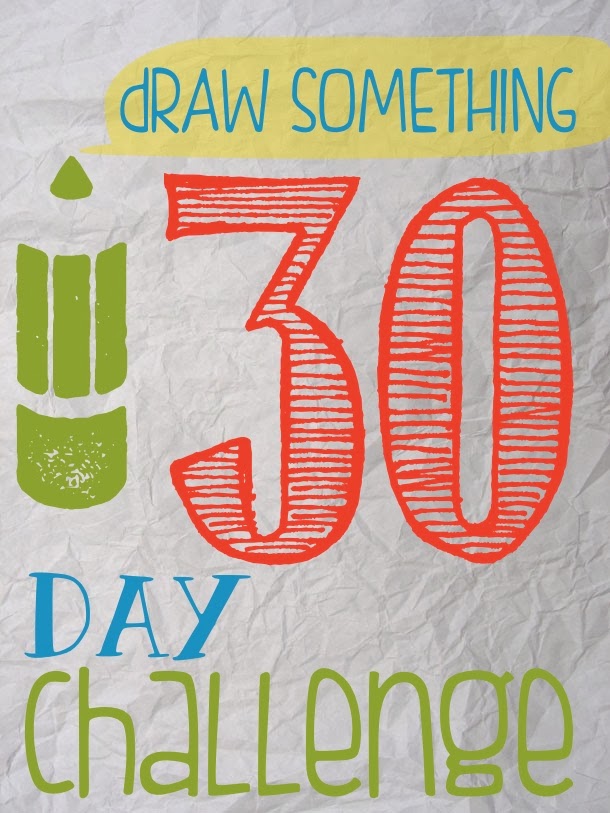
To be honest, it always bugs me a little when I see drawing challenges with a list of things to draw each day. I feel like they’re rules I have to follow, and I’m not much for rules. Or even guidelines. Or instructions for that matter (if you couldn’t already tell by previous posts with recipes).  I like to draw what I want, and whatever I feel like. 
So I have made a short list of suggestions for those of you who don’t know where to start:

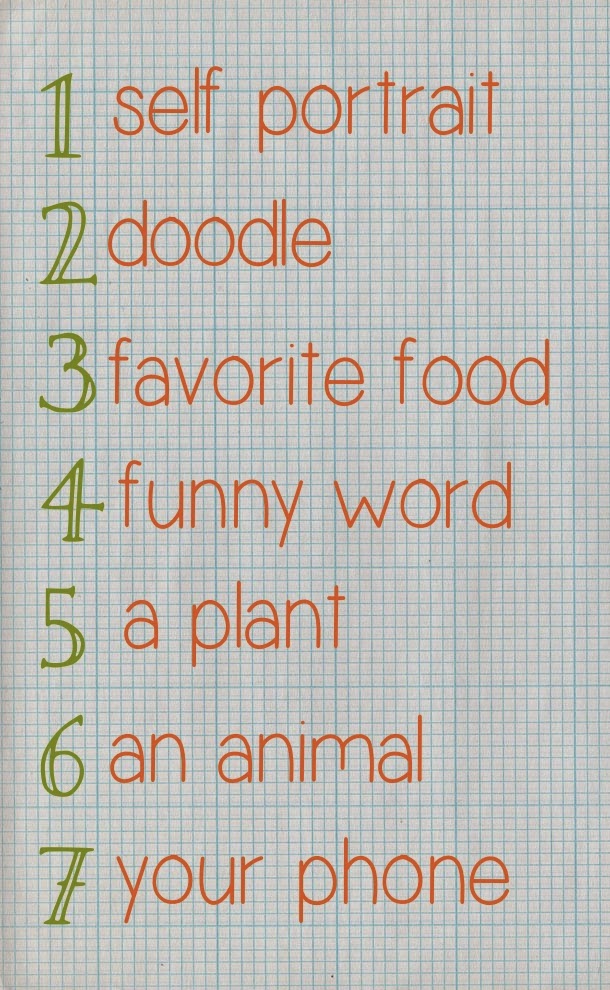
But really, the purpose of this exercise is to just draw. Grab a pen or pencil and start moving it around on a piece of paper and see what happens. Draw something that’s right in front of you. Draw your kids’ shoes, your stove, draw some scribbles and add some arms and legs to it. 
Just draw.
I’ll be doing so every day–and I’ll be sure to show you guys my sketchbook as I go along.
If you’ll excuse me, I’m going to go get started!
Make It and Love It

Bubbly Nature Creations

Marble Cheesecake Brownies

I’m so excited to be sharing these with you today!
One of my favorite sweet treats to make is brownies, so when I make brownies I always try to make them different. Either adding nuts, or Reeses chips, or something else. I’m always experimenting.
My favorite brownie recipe is by King Arthur Flour. It is seriously AMAZING!
No Joke.
I’ve tried a lot of brownie recipes and for the longest time the box brownies were my favorite. Then my mom told me about King Arthur Flour’s brownie recipe and I basically died and went to heaven it was so good! Better than box brownies to me. Since then I have not bought a box mix of brownies.
Anyway I changed the recipe up and added a cheesecake element. YUM! Two of my favorite things!
(I feel like I should be singing in the Sound of Music!)
You’ll Need:
Make one batch of batter of your favorite brownies (Or mine King Arthur Flour)
Makes 24, 2″ brownies
Cheesecake part:
1 Egg
1 cup of sugar
1 8-oz. package of cream cheese, softened
(Optional) Chocolate chips for sprinkling on top.
After you’ve made your brownie batter, in a separate bowl combine the 3 cheesecake ingredients, egg, sugar, and softened cream cheese.

Mix Until creamy and well combined.

Now you should have the two bowls, one brownie batter, one cheesecake batter.

In a 9″x13″ pan, put in brownie batter and spread to all the corners.

Then glob the cheesecake batter on top and smooth out as best you can.

Now with a butter knife or a small spatula, make a large wave in the two batters.

Then make a wave in the batter going the other way.

Continue adding alternating waves for a few more times.

Eventually it’ll begin to make a marble effect.

Then sprinkle some chocolate chips on top if you want.

Pop in the oven and bake according to your brownie recipe, you might need to add about 5 minutes, just enough for the cheesecake part to start to turn a golden brown.

Let cool for a few minutes and enjoy! SO good! One of my all time favorites!
Make It and Love It

All Things with Purpose

Bubbly Nature Creations

Puzzle Blocks

Today after work I needed to get my hands messy with something. Staring at a computer screen all morning takes its toll sometimes. I broke out the big tools to make these puzzle blocks and I had a lot of fun once I figured out what I was doing.
I surprised myself with this project–I thought I was going to fail miserably at it. It’s far from perfect, but I’m proud of myself for not giving up.
These weren’t super hard to make…but if you want to make these, definitely block out your afternoon. If you don’t want to cut out the blocks like I did (which, I don’t blame you) and you buy a set of wood blocks ready to paint, this project won’t take you long at all.
I was rummaging in my parents basement and found some scrap pieces of wood about 2 inches by 4 inches. I found six of those that were all roughly the same width and cut them in half.
When I say I cut them in half…I used a saw. 
I haven’t sawed anything since 7th grade woodshop. 
I told Alix what I was going to do and she said, “It’ll be a good story if you cut off your finger”. 
Awesome.
I still have all my fingers.
Anyway, after I cut them all in half (very poorly I might add. Like I said…I haven’t done anything like this since I was 12.) they needed to be sanded. This is the first time I almost gave up. I used my electric sander so it would go faster…but these are very small pieces of wood so I took some skin off my fingers during this process.

The second time I almost gave up was fitting all the pieces together as close as I could. My precision sawing skills need a little help…as you can see. I didn’t want huge gaps so there was a lot of sanding and a lot of rearranging. At one point, I knocked them all off the table and had to start all over again.
But once they all fit as well as I could get them, I put a rubber band around them to keep them secure.

Then I spent some time sketching out some ideas for the pictures I wanted to paint on the blocks.
Sketching is VERY important. You get a chance to fix all the mistakes and plan your ideas out on paper before you go ahead and draw or paint all over everything. You’re less likely to make a mistake on your finished product if you spend a good amount of time sketching. I stress this to all my students… and most of the time I won’t let them begin their project without seeing their sketches. 

Once I had everything where I wanted, I started painting. 
A couple coats will do…enough to clean up your lines and cover up any pencil marks.

I painted all the sides one color and then flipped everything over to paint another picture on the other side (after I sketched it all out of course!)

I love how these turned out! They have my creative wheels turning and I have a few ideas for other block projects. I might need to take some time and let the skin on my fingers grow back before I get started on a new adventure!

p.s. I’ve linked up over here. Go take a look!

Bubbly Nature Creations

All Things with Purpose

Wrap-Around Bead Bracelet

Happy Valentine’s Day!
I’m so glad you’re here! 
And I’m so excited to be sharing a cute little tutorial today!
You can make this as you spend Valentine’s Day in, or make it for the hot date you have tonight, or just because you want to! Any reason is good enough for me!
I’m not much of a jewelry person. You can usually find me in my wedding ring, sometimes earrings, sometimes a watch, sometimes a bracelet, and very rarely a necklace.
I have a few pieces of go-to jewelry and one of my very favorite bracelets my friend Tiff made for me. Well I thought that I’d show you how to make it. The fun part about this bracelet too is that you can make it as long as you want and have it wrap around your wrist as many times as you want. The one Tiff made me wraps around 4 times. The one I made only wraps twice so it just depends on how you want it to look.
You’ll need:
-a bunch of beads (mine are about a quarter inch in diameter, I forgot to save the packaging so I can’t tell you exact)
-2 strands of thicker string (I used some strips of suede)
-1 very long strand of clear floss, which will be used to wrap around the other strands and through the beads
-Button or toggle to finish

Once you have everything I put some beads in a little container for easy threading.

Next take your two thicker pieces of thread and your clear thread which needs to be a lot longer, like 3 times longer than the rest, maybe even more just for good measure. The thicker strands need to be as long as you want your bracelet plus a little extra for finishing and a knot. (If you want it to wrap around 4 times then it needs to be a lot longer than mine.)
Put the 3 strands next to each other.
Then tie a knot with all three, leaving a loop where the bracelet will fasten.

Then anchor it to something that’ll keep it in place while you add beads to it. Turns out my sewing machine was heavy enough to keep it in place.

Then we are going to start beading. I started showing you after I had done a few but you start it the same way.

First you start with the clear thread on top of the large thread on the left.

Flip it underneath the left thread.

Add a bead and then put the thread on top of the right side of larger thread.

Making sure the bead stays in the middle of the two larger threads, wrap the clear thread under and around the right larger thread.

Then put the clear thread back through the bead, putting the end of the clear thread through the right of the bead to the left.

Pull tight and start with the clear thread on top and you’re DONE with this bead. Repeat wrapping the clear thread, and adding beads until it is the desired length.
(I just kept the pattern of  “on top, wrap under, bead”)

It took me awhile, especially since I had little hands helping me inspect every bead.

But it sure looks cool when it is done!

To finish I tied some knots at the very end.

Then I add a toggle. Or a button or whatever that’ll fit in the knot at the beginning.

Then you’re DONE! Wrap it around and have fun!
Doesn’t it look awesome!?

Make as many as you want, and have fun with colors, and lengths!

 
All Things with Purpose

Draw String Bags

As promised….bags for your Story Time Stones, or whatever you want to hold in them.
I’m still no expert at sewing…I think I could barely be considered a beginner…but if you can sew a decently straight line, you can make these. 
What you’ll want to do is cut out a random (or not so random…that’s all up to you) shape from some muslin. Or you can use any other kind of fabric you want. I chose muslin because its pretty cheap.
(If you do use muslin, double it up because it can be pretty see through)
I wanted my bag to be about 10in by 10in. So I cut out a piece of fabric that was 10in by 20in, because I was going to fold it in half so I didn’t have to sew up the bottom.
Before I sewed the bag together, I stitched on my muslin shape to the front.

Once the shape is stitched on, I folded the fabric in half, so it was inside out, then I sewed up one side.
Before sewing up the other side, I wanted to make make an opening for my drawstring. I folded over the top part of the bag about an inch, pinned it down and sewed my opening. It’s basically like you’re making a hem, but the both ends are left open so you can put your drawstring in later.

I sewed up the other side and turned it right side out.
Looking pretty good, huh!?
This bag kind of reminds me of an apple.
To finish it up, I took a piece of drawstring…I used this shoelace thing, but you could use ribbon or rope…

And voilà, you have your very own bag! 
Hopefully I can pass my beginning sewing level once I make a few more of these and can actually sew a straight line…or maybe I’ll have to wait until I can sew something other than a square.
Either way, I think I’m slowly getting the hang of this sewing stuff.
P.S. I brought the Story Time Stones game to play with my Activity Day girls last Tuesday and they LOVED it. We played about three rounds and came up with some amazing stories, but this one in particular I thought was hilarious:
Stormy Night
One night there was a terrible storm with thunder and lightening. Sheep lived up in the clouds with the moon and the stars. It rained so hard in the clouds that night that Bob floated on his ship over to the mountain clouds where Sheep lived. All of the sudden, a giant monster came from behind the clouds to eat Bob and the sheep but noticed some fancy balloons that he grabbed on to. He floated up out of the clouds into outer space, all the way to Jupiter where he found Susie, Bob’s soulmate. It started to rain on Jupiter so the monster ran away, but all the water flushed Susie back down to the clouds on earth where she found Bob. They lived happily in the mountain clouds with their pet owl and their neighbor, Sheep.
The End

FREE Printable Recipe Cards

So lately Chelsea and I have been posting quite a few recipes. Either 
OR
Maybe you missed some of our earlier recipes, 
Well all these recipes got me to thinking that come FREE PRINTABLE RECIPE CARDS were in order.
There have been many times where I have friends over and I make cookies, or brownies, or some other dish and someone asks for the recipe. Usually I jot it down on a ugly 3×5 card. Then it got me to thinking. Some cute, fun, printable recipe cards that can be stashed with all my recipes was a good idea. Then when someone asks for a recipe I already have a cute little card I can write on and cute enough that whoever gets it will actually want to keep it nice.
OR
You can keep the nice recipe cards and put your own recipes of them for your own recipe box!
So I made a few for you!
And they are totally FREE!! 
If you click on each image it should take you to a PDF file of recipe card that will print 4 on a page!
You can then use them just like they are or you can glue them onto some cute decorative paper.

Thanks for stopping by!

Valentine’s Day Decorations

Lover’s Day is just around the corner and I have been making cakies and cookies for all my friends.
I thought I’d take a break from all the baking and give my house some much needed love. I cleaned up the kitchen, did a few dishes and folded all my laundry I’ve been meaning to put away. Then I got to decorating.
I made some cute arrows (which to be honest I don’t know what to do with. If you make them…tell me what you used them for.) I also made some wax hearts, which I think are so adorable and look fantastic in my kitchen window.
 The wax hearts are so simple to make.
All you need are some crayons, an iron, wax paper, and a knife or some scissors.
I rolled about 14-15 inches of my wax paper out of the box and folded it in half (then opened it up again to put in my crayon shavings).
I peeled the paper off of the crayons, took my knife and shaved little pieces onto my wax paper.
 I closed my wax paper, and folded the ends up to trap all my crayon shavings inside.
I took my iron and gently tapped the wax paper to melt all the crayons. I didn’t press down very hard before everything started melting together. It was so cool to watch it all mix together.
I let it cool for a few minutes before I cut out different shaped hearts.
All that was left to do was punch a little hole in the top with a pin, string some thread through and hang them.
I think they look the best in a window. The light catches them and they’re so pretty!

The arrows took a little more time, but I love the way they turned out. 
I had a few little shish-ka-bob skewers in my cupboard that I used for the stick part, fabric remnants, and little super glue and embroidery thread.
Instead of just gluing the “feather” part on to the end, I used my scissors to carefully split the ends a few inches. It’s a little tricky, but if you hold the skewer tight against the length of the scissor it’s a little easier. 
Using some left-over vinyl and bits of fabric I had left over from other projects, I cut some feather shapes and bunched them all together before I shoved them all down in between the split ends. I dabbed on a little glue to the sides, and then took my embroidery thread and wrapped everything tight.
I used more of the embroidery thread to decorate the arrows, and for the little pointy part, I cut out little hearts, and arrow shapes from my vinyl and glues them on to the end. 
They’re awesome, now if only I could figure out what to do with them. 
At least they’re fun to look at! 

Enjoy your Lover’s Day!!

Raspberry Pecan White Chocolate Chip Gluten-Free Cookies

Did you see the post from monday? Red Velvet Cakies well it got my sweet tooth throbbing for something sweet, sugary, and delicious. So into my kitchen I went, and this is what I came up with! 
I’m pretty excited about these. Mostly because they satisfied my sweet tooth. They turned out to be delicious!
Although I am not gluten intolerant, I have friends and family that are and it is kinda fun to experiment with new ingredients.
Since I’ve been eating gluten-free foods I’ve also noticed that I don’t feel as “yucky” (not sure if that is the best word) after I eat a couple cookies. When I eat a couple regular cookies something I feel like there is a brick at the bottom of my stomach, with gluten-free cookies I don’t! Hooray!
I hope you enjoy them as much as I do! My little girl sure loved them. 
Raspberry Pecan White Chocolate Chip Gluten-Free Cookies
          yield: about 15 cookies (plus a few snitches of cookie dough)
6 Tbls butter
1/2 cup powdered sugar
1/4 honey
1 egg
1 1/2 cups Pamela’s Gluten and Wheat Free Baking and Pancake Mix (I’ve also found it at my local grocery store, so take a stroll around or ask!)
1/2 cup dried or dehydrated raspberries (or other fruit)
1/3 cup white chocolate chips (I used the brand Guittard Choc-Au-Lait Chocolate Chips they say gluten free right on the front)
1/3 cup chopped pecans

Preheat oven to 350 degrees F. Cream together the butter and powdered sugar. Mix in honey and egg. Then add the Gluten free baking mix. Mix until everything is combined. Then gently mix in the raspberries, white chocolate chips, and pecans. With a spoon drop about a 1-inch ball of dough onto a lightly greased cookie sheet. Bake for about 12 minutes.

Ok first let me tell you about this baking mix. My grandma introduced it to my mom, who introduced it to me. Pamela’s Gluten and Wheat Free Baking and Pancake Mix is such a good baking mix. I’ve made the pancakes from off the bag and I honestly prefer them to any other non-gluten-free pancake mix I’ve tried. They are so good. Seriously! I’ve also made the chocolate chip cookies off the back of the bag, which are also a good gluten free cookie.

Anyway this is what my dough looked like- then I added the pecans, dehydrated raspberries, and white chocolate chips.
Baked and enjoyed! YUM YUM!
Like always thanks for stopping by!
We Linked up at Home Stories A to Z

Red Velvet Cakies

I’m a cookie lover. I’m also a sucker for anything red velvet. However, I’m not a huge fan of cake. So I made these cakies instead. They’re both cake AND cookie!
They’re not entirely homemade…I used a box of cake mix. I’ll admit, I’m lazy and don’t always want to take the time to mix a ton of ingredients.
These are ridiculously easy to make.
Ingredients
1 box red velvet cake mix
2 eggs
1 stick of butter(melted)
2-3 tbs of flour
Mix everything together with a hand mixer or spoon, add in half a bag of chocolate chips and bake them for 15 minutes at 350º

I decided to make them fancy and put a little drizzle over the top of them.
This is also very easy…and no exact measurements.
I used about 2tbs of powdered sugar
3 tbs of milk
1 tsp vanilla
a drop of red food dye
Mix these up until its thick enough to drizzle over the top of the cookies. You may need to add in more powdered sugar or milk until you get the right consistency.
They are moist and delicious and perfect to give away as a little Valentines Day treat.
Or if you’re me, just eat as many as you can in one sitting.

We Linked up at Home Stories A to ZThe DIY Dreamer 

The Best Bread You’ll EVER Make & A Story

Seriously.
This is one of my very favorite comfort foods. 
Reminds me of home.
Cold winters.
Snow.
Snuggling in blankets with the family while watching a good movie.
It’s the smile on your face when you walk into the house and smell something delicious.
Even just thinking about this bread makes me smile.
It really is the best bread ever!
So soft.
So delicious.
Melt-in-your-mouth good.
And I have to thank my grandma for it.
She says she doesn’t remember if someone gave her the recipe or if she adapted it, but either way it’s a family favorite.

I just love stories about my ancestors so I thought it would be fun to share a little story from my grandma about this recipe.

My Grandma her senior year and my grandparents on their weddings day

From the mouth (or from the text messages, yes my grandma is awesome and can text) of my grandma:
“I started making bread for our family when I was 10, using a booklet put out by the Home Extension service of the State of Idaho – very scientific and thorough. I made 6 large loaves every Saturday. When I first tried, my dad told me it was as good as his mother’s (My great-great Grandma). When he said that I was totally hooked. When I went to BYU, I continued to make bread every Saturday, but always made one loaf into cinnamon rolls. That is what attracted Grandpa (my Grandpa). Him and his roommates would come over Sunday evenings because they knew we had homemade cinnamon rolls.”

Anyway on to the bread! It’s so good!
…….
………..

White Bread 
          yield: 2 loafs
1 2/3 cups lukewarm water
2 1/2 tsp yeast
1/4 cup oil
1/4 cup sugar
1/4 cup non-fat dry milk
1 /34 tsp salt
4 cups flour
In a small bowl, combine yeast and water. Leave for about 5 minutes to soften. In another bowl combine oil, sugar, dry milk, and salt. Mix well. Add yeast mixture once it has softened. Add flour, mix and knead. Dough should be slightly sticky to the touch.
Cover dough and let rise until it has doubled in size. Knead.

Pinch in half and form two loafs. Place in lightly greased bread pans and let rise until they have doubled in size. Bake at 320 degrees F. for about 30-40 minutes, or until golden brown on top.

………..
……

Combine 1 2/3 cups lukewarm water and 2 1/2 tsp yeast in a bowl, or a measuring cup.
Let the yeast soften for about 5 minutes. Softening happens when the yeast is in lukewarm water, so it is really important it is just lukewarm. Not too hot and not too cold, but just right Goldilocks.

Meanwhile in another bowl combine the salt, sugar…

oil…

and powdered milk. Mix. Then add in the yeast and water mixture when it is softened enough and mix.

Add the 4 cups flour. 

I usually add about 3 cups and let it mix well. Then I add the last cup gradually making sure that the dough doesn’t get too dry. Usually I end up adding about 1/4 cup more though. It all depends on your altitude. So add just enough to make the dough slightly sticky.

Once the dough is mixed well, cover.

Wait until the dough has about doubled in size, which is usually about an hour or so.
That also depends on how warm your kitchen is. The warmer it is the faster it’ll rise.

Then take out the dough and knead. Knead until all the bubbles and air pockets are out.

Then it’ll be a nice ball of dough!

Since this recipe makes two loafs, pinch the dough in half. Don’t try and pull the dough apart, pinching is much easier.

Then form the two dough balls into a loaf shape.

Place into lightly greased bread pans.

Cover, and set aside to rise again.

Then once it has about doubled in size again. Pop in the oven.

Then bake until they are golden brown which is usually 30-40 minutes in my oven. I’ve learned that every oven is different, so you might have to cook it slightly more depending on you oven.
Then cut, butter and ENJOY, or put on some Nutella, or jam or nothing at all. And I mean ENJOY! This bread is amazing. And my family usually ends up eating it all just with a little bit of butter before we can use it for a sandwich or something. 
(I actually cut one of these open and realized it wasn’t all the way done, so I put them back in the over for another 10 minutes, about 40 minutes total. So they ended up being a little more golden brown than in the picture.)

We linked up at
The Shabby Nest The DIY Dreamer 
Bubbly Nature Creations